How I Painted my Linoleum Floors
I love my kitchen. It's my favorite room in the house. Over the years, I've slowly transformed it. Step by step, my kitchen has really shaped up nicely.

First, I chose the colors. I browsed pictures of floors on the internet and found a color palette I liked. A cream and light brown. But before I could paint, I had to prime. I used a latex Kilz and painted one coat over the whole floor. Cutting in around cabinets with a brush and rolling the rest.


Next was two coats of the cream color. I used a latex porch/patio paint. Again, cutting in around the cabinets with a brush and rolling the rest.


It was already looking WAY better than before.
So then the hard part...and I'm going to try and explain this part as best as I can, its a bit tricky.


Once the squares were taped off, the fun part began! I cut in each brown square first, then rolled each one. I did two coats of the latex porch/patio paint.


After the paint cures for a few days, I'll be putting down a few coats of water-based Polyurethane made specifically for flooring. I'll update this post when I do.

Next week, I'll be putting up my tile backsplash, tune in for that post!
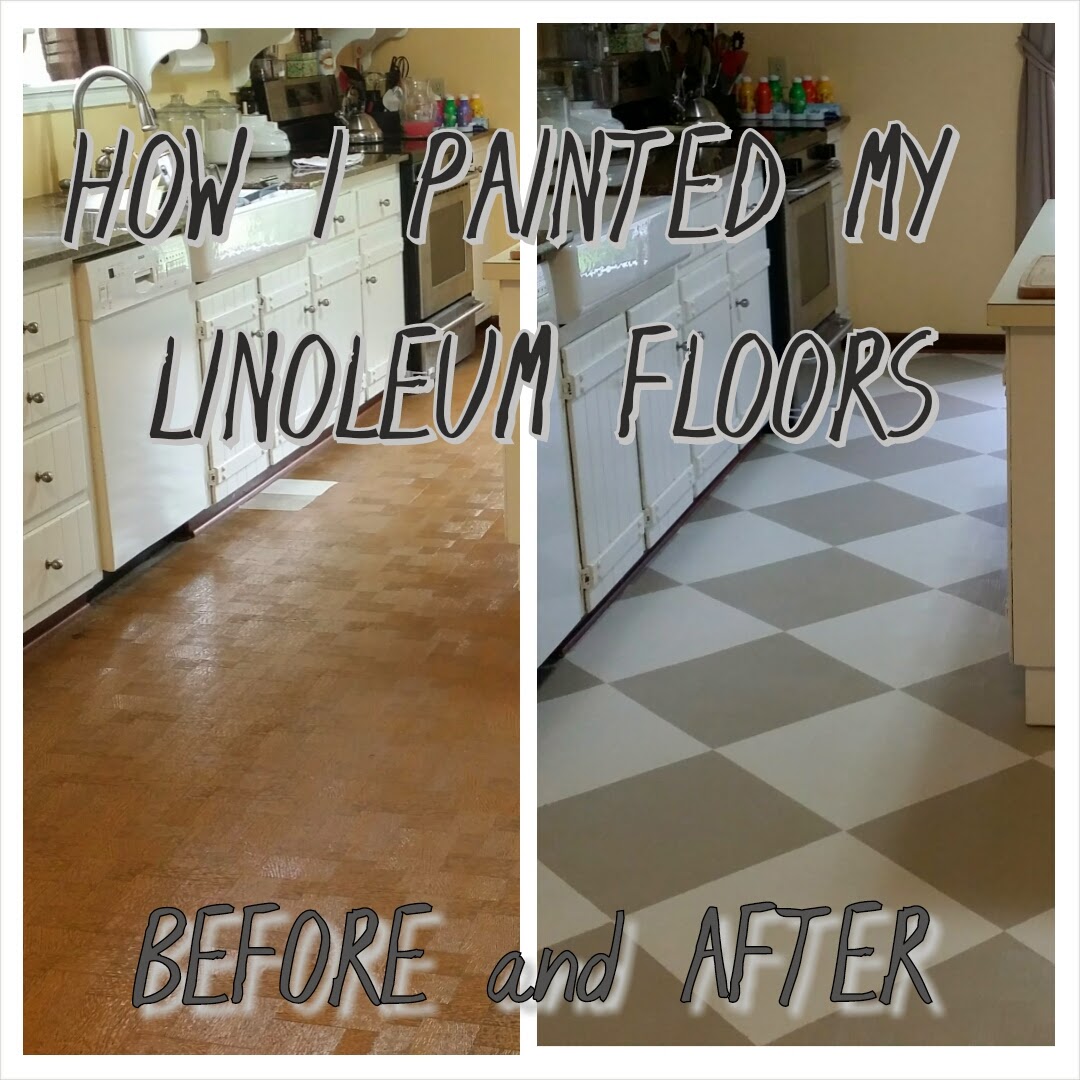
Behold the before picture. Ceiling fan in the kitchen? Four different finishes of wood...old countertops and ugly linoleum floors. We began by painting the cabinets, island, window frames, and shelves white, and the walls a soft yellow. Later we replaced the sink with a large farmsink and the counters with a beautiful quartz. You can see my other kitchen renovation posts HERE.
One thing we just don't have in the budget right now is replacing the floors. But I really wanted to do something with it in the meantime. Paint can fix just about anything, so naturally, I decided to paint my linoleum floors. Here's how we did it.
First, I chose the colors. I browsed pictures of floors on the internet and found a color palette I liked. A cream and light brown. But before I could paint, I had to prime. I used a latex Kilz and painted one coat over the whole floor. Cutting in around cabinets with a brush and rolling the rest.
Next was two coats of the cream color. I used a latex porch/patio paint. Again, cutting in around the cabinets with a brush and rolling the rest.
It was already looking WAY better than before.
So then the hard part...and I'm going to try and explain this part as best as I can, its a bit tricky.
I knew I wanted to paint a checkerboard design on the diagonal since my kitchen is so big, I thought painting them straight across would make it look too long. I also knew 12 inch squares were too small for my kitchen and 24 inch squares were too big. I went between the two sizes and decided 18 inch squares would be perfect. I also wanted to center the first square right under my sink and go out from there. Once I got those things in order, I was able to begin taping off squares.
You'll notice in the pictures that I alternated the tape from the inside to the outside every 18 inches. This was because I was essentially bordering out the squares I intended to paint AND protecting the edges of the squares I wanted to keep white simultaneously. I'll be elaborating on this at a later date.
You'll notice in the pictures that I alternated the tape from the inside to the outside every 18 inches. This was because I was essentially bordering out the squares I intended to paint AND protecting the edges of the squares I wanted to keep white simultaneously. I'll be elaborating on this at a later date.
Once the squares were taped off, the fun part began! I cut in each brown square first, then rolled each one. I did two coats of the latex porch/patio paint.
After the second coat dried, I got to pull up all the tape. So. Much. Tape.
After the paint cures for a few days, I'll be putting down a few coats of water-based Polyurethane made specifically for flooring. I'll update this post when I do.
In the meantime, please enjoy a picture of me with all the pulled up painters tape on my head.
Next week, I'll be putting up my tile backsplash, tune in for that post!


Comments